Showing posts with label recipes. Show all posts

Friday, July 22, 2011

4th of July


Ellie marched in the parade. We all watched.

Tons of fireworks visible from our house-love that.
Emma at EFY.
Rainy day that got super hot.
Grateful for our great country!


Posted by Picasa

Wednesday, February 9, 2011

Spinach Cubes

So, what do you do with that giant tub of spinach that you bought from Costco and know there's no way you will ever go through the entire thing before it goes bad? I decided to make spinach cubes. This was my own idea that I thought was pretty ingenious. I can't be the ONLY one who's ever thought of it, but this did come from my own brain.

First I cooked it, then blended it, then poured into ice cube trays.

Now they are ready to throw into the blender with my smoothies. They don't blend as quickly as ice. I noticed it takes a bit more blender time to really get them smooth. But it works. Fabulous.

Well, just when I thought I was on to something my friend told me that she just throws spinach into the freezer fresh. I had no idea that would work. So I guess I'll try that next time. Anyway, it was a good idea for a minute. Have any of you ever frozen fresh spinach before? Does this really work? I want to know.
Posted by Picasa

Thursday, July 22, 2010

Homemade Tootsie Rolls


Tootsie Rolls just happen to be Ellie's favorite candy and have been for many years. I think that's weird. As far as candy goes there are many things I would choose over Tootsie Rolls. But anyway, one day while she was eating one she saw on the wrapper that they were made in Chicago and since we were planning a trip out that way she got excited about going to visit the Tootsie Roll factory. So I looked it up and learned that they don't do public tours. Bummer! So we took the virtual tour which got our brains thinking that we could probably make our own. And wouldn't you know it, the recipe was easy to find online.
So, we spent one summer afternoon mixing Tootsie Rolls. They require a lot of mixing and then they're kinda like play-doh, which was lots of fun. Then we got to roll them in wrappers. The kids tired out quickly during that part, leaving me to roll the little things for a while.
Fun and kinda tasty. Took care of another summer afternoon. Yay!

Wednesday, July 7, 2010

4th of July Food

I was so excited about this jello dessert as I was making it, because I was sure it would be a big hit, despite the fact that it was red, white, and purple instead of blue. :( But, as is turned out my kids picked at it and mostly put it aside. This left more for me and I thought it was great. The white layer is cream cheesy and the purple (blue) layer is mostly blueberry pie filling. It was soooo good. . . to me anyway.
Posted by Picasa

Summer Sugar Cookies

This was a fun project that took a good chunk of a summer day. We had friends over to help us decorate. Fun and tasty!
Posted by Picasa

Wednesday, April 28, 2010

Navy Bean Soup

Okay, this is my last bean post. But, I couldn't neglect this one. It's a perfect Sunday meal.


On Saturday night soak 1 pkg of navy beans or 2 cups from your food storage white beans.
On Sunday morning drain the water. Add new water (about 6 C.) and boil for about 45 min. while you're getting ready for church. Then pour them into the crock pot with some cut up carrots, celery, cubed ham, onions (or about 1/3 C. from your food storage). Add some salt, pepper, garlic powder, Greek seasoning and a TBS. of salsa for good measure. (Or just use whatever seasonings you like best.) Set on high and when you get home from church this will be ready and wonderful.
I have seriously picky eaters and when we have this everyone eats and asks for more. It makes us all very happy. This makes a pretty big batch, but don't worry, it doesn't take long to eat it all.
Posted by Picasa

Monday, April 26, 2010

Lentil Brownies

These actually turn out more like Texas Sheet Cake. It's not health food, but if you're gonna eat 'em anyway, might as well be getting the nutrients of the beans in.


1/2 C. butter
1 C. sugar
2 tsp. vanilla
3 eggs
1 1/4 C. lentils cooked and pureed
1 C. flour
2-3 T. cocoa
1/2 tsp. baking powder
1/2 tsp. salt
1 C. pecans
optional--1 C. mini marshmallows (I add these if I have some that are getting old)

Blend butter, sugar, and vanilla. Add eggs and lentil puree. Mix well.
In a separate bowl combine flour, cocoa, baking powder and salt. Gradually blend into egg mixture. Lastly, add the pecans and marshmallows.
Pour into a greased 8" or 9" square pan and bake at 350 for 30-35 min.

Frosting

1/4 C. butter
1/8 C. cocoa
1/8 C milk (add 1 T. if needed)
2 C. powdered sugar
1/2 tsp. vanilla

Combine cocoa, butter, and milk in a saucepan. Bring to a boil. Add powdered sugar and vanilla and beat with electric mixer until smooth.
Posted by Picasa

Pinto Bean Bread

This bread turns out so moist with a great texture. Low-fat, high protein bread.


2 C. lukewarm milk (soymilk or powdered milk work great)
2 pkgs. yeast
2 C. pureed beans (pinto, white, black-eyed peas, whatever)
2 T. sugar
2 tsp. salt
2 T. shortening, melted
5-6 C. flour

Combine the milk, beans, sugar, salt, shortening, and 1 T. of the flour

Stir in the yeast and wait for it to bubble.
If it has not bubbled in 5 min, get new yeast.

Stir in 5-6 C. flour to make a kneadable dough.
Knead 5-10 minutes, until satiny.

Place in a greased bowl, turning to grease dough.
Cover loosely with a clean, damp cloth and let rise till double.

Punch down; let rise again. (You can leave out this step, but the bread will be more dense. I don't recommend it.)

Punch down; shape into 2 loaves.

Place in greased loaf pans.

Bake at 350 for 30-40 minutes, or until golden brown on top.
Posted by Picasa

Frito Lay Bean Dip

This is my favorite thing to do with cannery refried beans. It's great.

15 oz. can of refried beans OR make 1 1/2 - 2 C. refried beans from your food storage
4 jalepeno slices
1 T. jalepeno brine
1/2 tsp. salt (I usually omit this. I don't think it needs it.)
1/2 tsp. sugar
1/4 tsp. onion powder
1/4 tsp. paprika
1/8 tsp. garlic powder
1/8 tsp. cayenne pepper

Puree ingredients on high until smooth. Cover and chill for at least an hour before serving. . . (if you can wait that long. I never do.)

Friday, April 23, 2010

Black-eyed Pea Cornbread


1 C. cornmeal
1/2 C. flour
1 tsp. salt
2 eggs
1/2 C. vegetable or corn oil (I use way less than this-- usually about 1/4 C. -I've never missed the extra)
1 C. buttermilk (or powdered milk from your food storage)
1 med. onion, chopped (or reconstituted from your food storage. I just throw about 1/3 C. into the mixture and add about 1/2 C. water
2 jalepeno peppers, chopped (If you like it spicier, add one more)
3/4 C. drained corn
1 lb (or so) browned sausage, or leftover taco meat
1/2 lb. grated cheddar cheese (I use less than this. I just throw a handful in.)
1 C. cooked black-eyed peas

Add ingredients in the order listed. Mix a bit as you go. Cook in 9x9" greased pan at 350 for 45 min. or until golden browned on top.
Posted by Picasa
Posted by Picasa

Bean Salsa

1 15 oz. can black-eyed peas (or about 1 1/2 C. cooked from dry)
1 15 oz can black beans, drained and rinsed (or about 1 1/2 C. cooked from dry)
1 15 oz can whole kernel corn, drained
1/2 C. chopped onion (or reconstituted from your food storage)
1/2 C. chopped green bell pepper
1 4 oz. can diced jalepeno peppers
1 14.5 oz. can diced tomatoes, drained (or freshly diced)
1 C. Italian-style salad dressing (I never use this much. The sample I brought had about 1/2 C.)
1/2 tsp. garlic salt.

Combine all ingredients. Add fresh cilantro if desired.

I use this as much more than just a chip dip. I put it on salads as THE dressing. I put it on scrambled eggs, or serve with cornbread as a side. (Cornbread recipe to follow)

Thursday, April 22, 2010

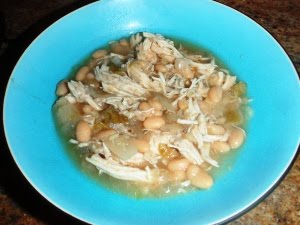
White Chicken Chili


2- 15 oz. cans Great Northern white beans, drained OR about 3 C. cooked white beans
4 C. chopped, cooked chicken breasts OR 2 cans of chicken including the broth
1- 7 oz can chopped mild green chilies
1 1/2 tsp. dried oregano, crumbled
1/4 tsp. cayenne pepper
3 C. grated Monterey Jack cheese (about 12 oz) (I use way less than this.)
2 T. olive oil
1 large onion OR about 1/3 C. dried onion and 1 C. water
4 garlic cloves, minced
2 tsp. ground cumin
6 C. chicken stock
sour cream for garnish if you like

Cook and chop chicken. (I usually use canned for convenience.) Heat oil in heavy pot. Add onions and saute about 5 min. Stir in garlic, chilies, cumin, oregano, and cayenne; saute about 5 min. Add beans and stock; bring to boil. Reduce heat and simmer uncovered. Stir occasionally about 2 hours. Add chicken and 1 C. cheese to chili and stir until cheese is melted and chicken is hot. (I usually just throw the chicken in with the rest. I've never noticed it to be a problem). Season to taste with salt and pepper. Top bowls with cheese, sour cream and tortilla chips if desired.

P.S. I have never met anyone who didn't love this.

It's BEAN week


The next few posts are for the benefit of anyone who came to the bean class and wanted the notes. I thought this might be the best way of getting the info to those who wanted it instead of sending emails out to everyone who doesn't. If you are a friend or family member who thinks you are going to learn something interesting about our current lives, sorry. You may be interested in knowing that we're eating more beans than usual this week. But feel free to read about beans if you would like to.

Bean cooking tips:
1. Make sure beans are fully cooked before adding acidic foods like tomatoes, chili sauce, lemon juice, vinegar, or ketsup. This will slow down the cooking process.
2. Salt toughens beans so wait until the very end to add salt.
3. Add a few drops of oil (1/4 tsp or so) to the boiling pot. This will reduce the foaming.
4. Drain the soaking water before you begin the cooking process. This will reduce the "gasiness" of the beans.
5. If you add about 1/8 tsp. baking soda per cup of dry beans while they cook it will reduce cook time by about one-fourth.
6. Boil gently and stir very little. You really don't need to watch them much.
7. Make a big bunch at a time. Freeze some whole to add to recipes later and puree some to add to recipes later. Mark the bag with the amount. I usually freeze 1 cup portions. Then I can thaw as much as I need for the recipe I'm using.
8. Use the pureed beans in place of butter or oil in any baked good. If it calls for 1/2 C. butter, just use 1/2 C. puree.
9. Use in place of or to supplement ground beef in casseroles, tacos, burritos, etc. The beans will absorb the flavors just like the meat would.


If you have any questions feel free to ask in the comment section. I will answer.
Next up are my favorite bean recipes. These are the ones I really do use the most often. But don't feel limited. I don't. I use tons of bean recipes.

Thursday, February 25, 2010

Truffles

I just finished reading Cherry Cheesecake Murder by Joanne Fluke. She has written many murder mysteries in a series and they are all filled with recipes because the main character is a bakery owner. I didn't actually enjoy the book, but the recipes were great. I wanted to make them all. Since it was a book club book we all made one of the recipes from the book for our meeting. It was fun and truly, all of the food was great. This was my contribution. And here's the recipe. Totally easy and super yummy.

6 T. chilled butter
12 oz. pkg. semi-sweet chocolate chips
1/2 C. powdered sugar
6 egg yolks
1 T. rum, brandy, or vanilla extract

Cut the butter into small chunks into the top of a double boiler. Add the chocolate chips and powdered sugar and let it melt in the double boiler stirring occasionally. In the meantime, separate 6 egg yolks out and beat (not till they change color, just until thoroughly mixed). When chocolate mixture is completely melted add egg yolk one spoonful at a time and mix completely. When it is all mixed in add the extract. Let this mixture cool in the refrigerator for about 3 hours. Then, form into balls and roll in sprinkles, nuts, sugar, cocoa powder, chocolate shavings, etc. These are really tasty.
Posted by Picasa

Saturday, February 6, 2010

Ooey, Gooey Birthday Party

Hooray! Lauren is 9 and her party is over! Lauren has always been unique. . . individual . . . and proud to be so. While I love this about her, it also drives me crazy sometimes. She also LOVES everything messy; the messier the better. Well, it's party year at our house, so Lauren's idea of a perfect party is an "Ooey, Gooey Party". Can you imagine what this is? This is a party where you get together with 7 of your best friends and make things like Ooblek, and Glop, and play with Gak, Noise putty, silly putty, Floam, and a variety of other gooey things. Then, you watch a "scary" Goosebumps movie and sleep over. Then you get up and make name pancakes with everyone. Unfortunately I don't have a single picture. It was a full time, hands on job managing this event. Of course, Richard did his job by getting as far away from this as possible. . . all the way to Pheonix. Then, Maddie ended up being a huge help (NOT) by going to a movie with her friends. Thank heavens for Emma.
The kids all seemed to love it. They all wanted the recipes and declared this party as the BEST birthday they'd ever been to and many decided they wanted an Ooey, Gooey party this year. That made me laugh.
The pictures we do have are of the night before when we went to Red Robin as a family.
Just in case you want an ooey gooey event I'll post the recipes. I really don't suggest this as a sleep over. It's a bit too much.

Glop

4 oz. bottle of white glue
2 liter bowl
1 pt. distilled water (I didn't use distilled and it worked fine)
Borax powder
Food coloring

Pour glue into a bowl. Fill the glue bottles with water, shake and pour into the bowl. Add 1 C. water and food coloring. Stir. Add Borax 1 tsp. at a time and stir until glop starts to form. Take glop out as you see it forming and continue to add Borax to the remaining mixture.

This really is fun to play with.

Ooblek

1 1/2 C. cornstarch
1 C. water
food coloring

mix together and see the magic. Tap it hard and it feels like a solid, set your fingers on it and it feels like a liquid. Add extra water the next day and it's still lots of fun.
Posted by Picasa

Wednesday, September 23, 2009

Homemade Crackers


If you've ever seen my family with a box of Cheesitz you must have been around for a rare 2-3 hours right after I bought them. That's really about how long it takes for my girls to devour an entire box of this delicous treat. And if you've ever had them in your house while my girls happened to be there, I'm sorry. Surely I now owe you a box of crackers. So, given that I can't seem to keep them stocked I thought that perhaps I would try to make some myself. After doing a quick search I came across a cracker recipe that I thought would be great. I substituted some of the flour for cheese powder and this is what I came up with. They really were pretty good. Of course, they do NOT compare to the real thing, but were a tasty treat all-in-all. Good news: I thought it was a success. Bad news: I ate them all because noone else did.
Posted by Picasa

Saturday, April 25, 2009

Chocolate Preztels

Looking for a fun and simple (and edible) craft? Here's what you do. Run over to Michaels and buy this cool pretzel mold. Melt the chocolate in baggies, cut a hole in the corner and let your kids squeeze it into the molds. They had a lot of fun doing this. They were way more interested in eating the pretzels than the "chocolate" anyway, which was okay with me.
Posted by Picasa

Tuesday, December 11, 2007

How to Soften Brown Sugar


So, I went to use some brown sugar today that had been in my cupboard for over a year and wouldn't you know, it was hard as a rock. It was just a small box, but I had two of them and yes, they were both like concrete. I knew I had heard of ways to soften the brown sugar before, but couldn't remember, so I turned to the trusty (this time anyway) internet and found these great tips. I thought I'd share just in case any of you may run into this trouble as you pull that sugar out to do some holiday baking.


It happens to the best of us: rock hard brown sugar. How to soften it? Ten easy tips below:
Place the brown sugar in an airtight container with a slice of fresh bread placed on top. Seal and leave overnight. It should be soft and fresh again in the morning, if not just let it sit another day or two.


Sprinkle a few drops of water over the chunk of hardened sugar, place in a plastic bag, seal, and let sit for a couple days.


Place brown sugar in an open container, then top with a moistened cloth (paper towel works too). Let sit overnight.


Place the hardened sugar in an airtight container with a few apple slices. This should soften the sugar within the next day or two. Remove apple slices once sugar is soft again.


Use foil or plastic wrap to cover the top of the sugar. Then set a dampened sheet of paper towel (not dripping wet) on top of the foil. Place in an airtight container and seal. Let sit overnight or a few days as needed. Remove foil and paper towel once the towel is dry and sugar is fresh again.


Buy a clay disc or if you have a pottery piece on hand (from a broken clay pot, etc.), set it in water for about 30 minutes. Dry the piece so it isn’t dripping wet. Put the clay piece in a container with the sugar and seal. Check after a few days. Keep the piece in with your sugar for months if you’d like–will keep it soft.


Quick Tip #1: Need the sugar soft now? Put the brown sugar in a container and place in the microwave with a small bowl full of water beside it. Microwave for about 1 minute–check. If it’s still hard, try for another 30 seconds. You can keep doing this until the sugar is soft, but watch that you don’t melt the sugar.


Quick Tip #2: Place the hardened sugar in a baking pan and set in oven (temperature at about 250° F). Check after 5 minutes. If still not soft, continue checking every few minutes until it’s soft and ready to use.


Quick Tip #3: Place the brown sugar chunk in a microwave safe plastic bag. Take a square of paper towel and moisten with water (not dripping wet–wring out excess). Place the wet paper towel in the bag with the sugar and seal. Place in the microwave for approximately 20 seconds. If still not soft, microwave for a few seconds more, repeating until the sugar is ready to use. Be careful not to melt the sugar.


Quick Tip #4: Stick chunks of the brown sugar in a food processor or blender and chop/pulse until useable.


For best results, make sure to store brown sugar in a sealed, airtight container. A clay disc kept in the container can keep it soft for months (see tip above for clay disc).
Brown sugar can also be stored in the freezer and thawed a few hours before using.

Friday, December 7, 2007

Persimmon Update

WARNING!! Do not eat them!!-- even if you get really tempted to try it. Just don't. EUWWWWW!! So, here's how it went. I cut it open when it was looking nice and ripe (just guessing of course, because I don't have a lot of experience with them.) It looked innocent enough; safe and harmless with its pink innards just soft enough to bite into. I got the idea from the internet that you could eat it raw like an apple. Which just goes to show that you can't trust the internet info. all the time. I bit into it and immediately there was a coating in my mouth that was making my lips stick to my teeth in kind of a squeaky way. I felt like I need to stretch my mouth out, and drinking water did not alleviate the problem. As for the taste, I'm not really sure. It was probably okay, but I was so overwhelmed with the feeling of it in my mouth that I didn't even pay attention to the taste. I think it would have been okay though, if only there was a way to get past the lip shrinking experience. Bottom line--if someone gives you persimmons, either throw them away immediately, or find a nice cookie recipe for them. The cookies were really good. Really, really good now that I know what they started out as.